Contents
Introduction
In today’s digital age, knowing how to capture screenshots on Windows is an essential skill. Whether you want to capture a funny conversation, troubleshoot errors, or share important information, the ability to capture screen images can be incredibly valuable. This article aims to guide you through the various methods and tools available for taking screenshots on Windows, helping you become proficient in this fundamental task.
Historical Background
Taking screenshots on Windows has evolved over time. In the past, capturing screen images required specialized software or complex commands. However, with advancements in technology, Windows has integrated this functionality into its operating system, making it easier than ever before to capture and save screenshots. As Windows has evolved, so have the methods and tools available for taking screenshots, ensuring a more user-friendly experience.

Key Concepts and Definitions
Before diving into the different techniques for capturing screenshots, it’s important to understand the key concepts and terminology associated with this skill. A screenshot refers to an image taken of the contents displayed on your computer screen. Windows offers different types of screenshots, including capturing the entire screen, an active window, or a custom selection of your choice. To perform these actions, you’ll need to familiarize yourself with terms like “Print Screen,” “Snipping Tool,” and various Windows key combinations.
Main Discussion Points
Capture the Entire Screen
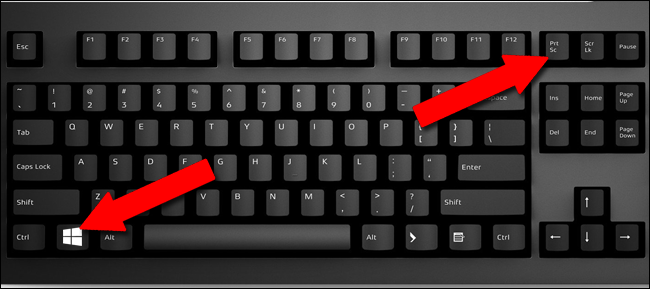
Capturing the entire screen with the Print Screen key is a straightforward process. Press the “Print Screen” button on your keyboard, usually labeled as “PrtScn” or “PrtSc,” to take a screenshot. The captured image is then saved to your clipboard. To save the screenshot as a file, open an image editing software (such as Paint) or a document processing software (like Microsoft Word), and paste the image using the “Ctrl + V” key combination. Finally, save the file in your desired format and location for easy access.
Capture an Active Window
To capture the contents of a specific window, make sure the desired window is active and in focus. Press the “Alt + Print Screen” key combination. This will capture only the contents of the active window, excluding any other elements visible on your screen. Once again, paste the captured image into an image editing software or a document processing software to save it. Remember to save the file for future reference.
Capture a Custom Selection Using the Snipping Tool
Windows provides an intuitive tool called the Snipping Tool, which allows you to capture custom selections of your screen. Open the Snipping Tool application, select the type of snip (such as free-form, rectangular, or full-screen), and capture the desired region. After capturing the snip, you can make annotations, highlight specific areas, and save the screenshot in various formats.
Additional Points: Screenshot Methods on Specific Windows Versions
Different versions of Windows may offer unique features or methods for taking screenshots. For example, Windows 10 introduced the Snip & Sketch tool, which combines the functionality of the Snipping Tool with additional editing capabilities. Familiarize yourself with the specific methods and tools available on your Windows version to ensure the most efficient screenshot-taking experience.

Case Studies or Examples
Capturing screenshots can be incredibly useful in real-world scenarios. For instance, when troubleshooting technical issues, screenshots can provide visual evidence of error messages or unexpected behaviors, aiding in effective communication with technical support. Similarly, screenshots can enhance collaboration by allowing individuals to easily share information, provide feedback on designs, or demonstrate step-by-step processes.
Current Trends or Developments
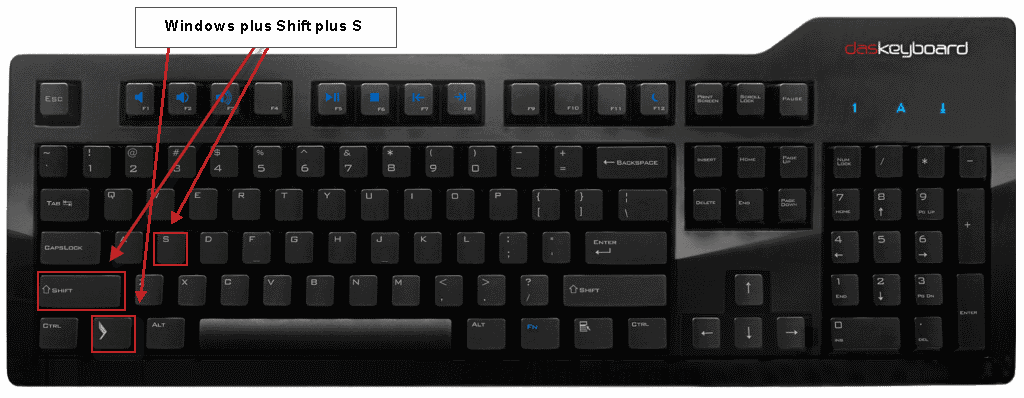
Advancements in screenshot capture methods and tools continue to enhance the user experience on Windows. Recent updates have introduced new features and functionalities, such as the ability to capture a specific area of the screen using the Windows logo key + Shift + S shortcut. These advancements make it even easier to take screenshots and streamline workflows.
Challenges or Controversies
While capturing screenshots on Windows may seem straightforward, there can be challenges and limitations. For instance, taking screenshots of certain protected content, such as DRM-protected videos or some streaming platforms, may be restricted due to copyright concerns. Additionally, privacy concerns can arise when sharing screenshots that inadvertently include sensitive or personal information. It is important to exercise caution and respect privacy when capturing and sharing screenshots.
Future Outlook
As technology continues to evolve, we can expect future developments in screenshot capture technology. These may include improved integration with cloud-based storage and sharing platforms, making it easier to save and access screenshots across devices. The increasing popularity of remote work and virtual collaboration may also drive the development of more efficient and seamless screenshot workflows.

Conclusion
In conclusion, learning how to capture screenshots on Windows is a fundamental skill that can greatly enhance your productivity and communication. Whether you’re troubleshooting technical issues, collaborating with team members, or simply capturing moments worth sharing, knowing how to capture screen images is invaluable. By familiarizing yourself with the various methods and tools available, you’ll be equipped to navigate Windows with confidence and efficiency.
References
For further reading and resources on this topic, consider exploring the official Windows documentation, which provides comprehensive guides and tutorials on capturing screenshots. Online tutorials and forums dedicated to Windows also offer valuable insights and tips for maximizing the screenshot-taking experience.
